Showing posts with label Texture. Show all posts

Thursday, December 9, 2010

Monday, September 27, 2010

Just for fun.

I borrowed my boyfriends splicer mask (which he didn't trust me with...) and I took the photos to work with the intangible theme I was doing earlier. Ended up not using them so I just edited them and put them on here.

Turning to stone

I like this one :) It isn't as realistic as I would like, but it is still cool to look at. (And this is similar to something I have had nightmares about :o ha ha)

Thursday, September 16, 2010

Helpful Resources

Shadow House Creations: Free Textures
Coffeeshop: Actions/presets/tutorials/brushes/frames
Brusheezy: Brushes/patterns
Best Photoshop Tutorials: Tutorials that are fun for photos. As well as creating digital artwork.
Dafont: Free fonts (make sure to read the authors terms/conditions.)
Photojojo: The newsletter has fun photo projects/crafts, and the store is pretty much awesome.
The Pioneer Woman: actions, and bits and pieces of everything else.

Wednesday, September 15, 2010

Editing Photos. Applying Textures in Photoshop.

*Click photos to make larger*

First off you are going to want to have some textures downloaded. I get most of my textures (which are free) from Shadow House Creations. Find a few that you like and save them somewhere you can easily find them.

Now select a photo you want to apply the texture(s) to. Open it in photoshop. Open the texture(s) you want to apply. I will be using this image.


In Photoshop go to texture image. In this case I'll be using Archaic Frame.
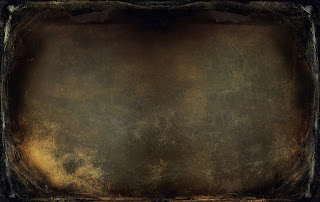

Copy the texture (shortcut command C) and then go to your image and paste it (command V).
Chances are the texture is smaller than the photo, so we need to transom it.


Go to edit > Free Transform (command T).
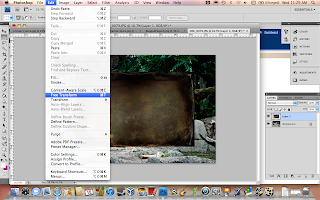

Grab one corner of the texture, hold down SHIFT and start to drag it towards the corner of your photo.
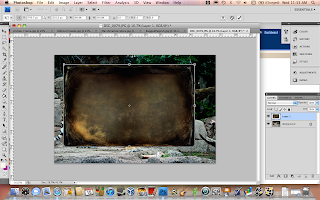
The texture may not fit the photo exactly. If needed let go of shift and just align the texture with all four corners of the photo. Or if you don't want to distort the texture you can keep holding down SHIFT and pull the texture out until it lines up with the photo. By choosing the second option you will lose part of the texture. Another option is to crop your photo.

Now you should NOT be able to see your photo at all because it is behind the texture. Now we need to edit the blending option to make the photo visible. Go to the Layer Tab > Layer Style > Blending Options.
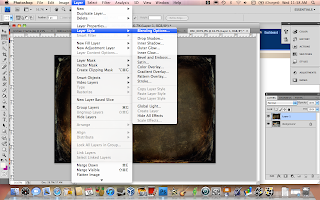

You can also just go to the Layers window on the right side of the screen to change blending options.


Now you just need to choose the blending option you like best. Play around with the Fill and Opacity if the effect is too light/dark.


Monday, April 5, 2010

Again...

Again I apologize for the lack of art work. I know I also promised a tutorial as to how to create a button for your blog, but I simply cannot figure out how to show how to edit an html code without the code becoming "active" in a way. I tried making the tutorial with my own image codes and instead of just the cod popping up the image would appear, even after I thought I had "broken" the code. If you would like a button for your blog I can design one for you. In other news though... The student art show is opening tonight at my school, I will finally be able to see if my picture made the cut! Also my project of the week is going to be some photos I just edited. They are vintage flowers, instead of the usual bright spring flowers that will start popping up pretty soon. Enjoy! Have a fantastic week.

- Candice


Wednesday, March 3, 2010

Death of Life

A series of images I created in photoshop. I love the texture in the backgrounds and the flocks of birds. I think the second and third ones are my favorite. I did not create these images to go together but I think it works having them placed side by side. As a whole the image is called "Death of Life" but each picture has it's own title. I was inspired by some music from My Chemical Romance. I listened through The Black Parade album while working on these. I also included each picture individually.

"Death of Life"

"Save Me"


"Fall from Grace"


"Rainy Day"


I got the textured backgrounds at Shadow House Creations. They are absolutely beautiful and helped add the grungy feeling to these pieces. I also downloaded some brushes from Shadow House as well as from Brusheezy. All brushes are free to use [rarely I'll come across brushes on brusheezy where the artist doesn't want you to make money off their creation unless you share] and they work great. I haven't been doing to well at keeping up with my project of the week so this is being added to make up for my negligence. Have a great week.

- Candice


Tuesday, March 2, 2010

Project of the week: Faded Grunge

A self portrait layered with textures. I have had the texture brushes for a while but didn't know what to use them for. I downloaded very beautiful textured canvases and blended everything together, then helped "age" the photo with the cracked brushes.
Links to the pages I downloaded from are at the bottom of my post. I got everything for free.

Brushes downloaded here.
Textures downloaded here.